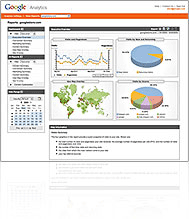
In Part 1 of this series, I summed up the various components that make up Google Analytics. In Part 2 here, I will go into what makes up the foundation for Google Analytics. I like to call it “Vanilla” Google Analytics.
“Vanilla” Google Analytics Tracking
The “typical form” of a Google Analytics install is what I like to call the “Vanilla” (or plain) version. It is the one that you are given tracking code for by default when you create a Google Analytics account.
“Vanilla” Google Analytics Tracking is used to track typical patterns you would expect to see with most “statistical tracking packages”. You’ll get information on things like where your visitors are coming from, what type of browsers they are using, how many unique visitors came to your site, etc…
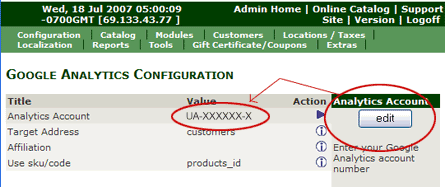
The code you use to install Google Analytics looks something like this and is usually placed near the bottom of every page you want to track information for. It’s the tracking code that starts with “UA-” at the beginning.
Sample of “Vanilla” Google Analytics Tracking Code:
This code is given to you by Google upon successful sign up of your Google Analytics account. Keep in mind that the “xxxxxx-x” shown in red above should be replaced with the unique tracking id Google assigns to your Analytics account.
Also keep in mind that if you are using an open source shopping cart like Zen Cart, there are third party modules already built that you can install, which make the process of installing the tracking code easier.
In many cases, after installing the third party module, all you need to do is to enter your unique Google Analytics ID into the configuration section of the admin. You can download Simple Google Analytics, one third party module, that will make it a bit easier to install Google Analytics Tracking code on your site.
Although the above information will install the tracking code on your web site, it will not necessarily “activate” tracking for it.
In order to activate tracking for Google Analytics, you must now login to your Google Analytics account and click on the “Check Status” link provided for the site you have installed the tracking code on.
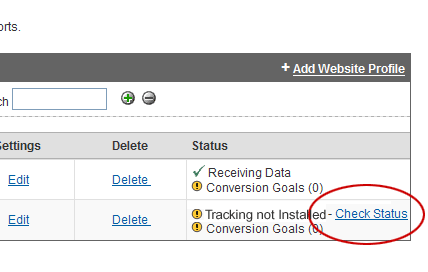
Once you click on the “Check Status” link, Google will go out to your website and verify that the tracking code is installed correctly. If it is installed properly, and you have given the proper URL to verify it, then you should get a screen that looks like the following.

I followed the instructions and am still getting a “Tracking Not Installed” message – what did I do wrong?
If you still get a message saying “tracking code not installed”, or “unable to verify tracking code”, then you need to carefully check a few things and try again.
- Check that that tracking code is actually in place on your site near the bottom of the page (top will work if needed, but bottom is desired).
The easiest way to do this is to view your website in the browser of your choice. Then perform a “View Source” of the page you are on. Now, scroll to the bottom of your page, and check for code that looks similar to that which has been present earlier in this post. If the tracking code is in place, and contains your unique Google Tracking ID (in place of the “xxxxxx-x”) then you have “passed” this first test.
- Make sure you carefully check the URL that you told Google to verify the code at. Google can’t verify the code exists if you give it the wrong URL to check.
Special Note: Make sure you do not forget the trailing slash (“/”) at the end of your URL or Google may have problems verifying the code exists. An example of what I am talking about is below for reference.
Examples of proper URL’s to give Google for verifying tracking code exists
http://www.yourwebsite.com (Incorrect URL Structure)
http://www.yourwebsite.com/ (Correct URL Structure – with the trailing slash “/”)http://www.yourwebsite.com/store (Incorrect URL Structure)
http://www.yourwebsite.com/store/ (Correct URL Structure – with the trailing slash “/”)
OK, if you have followed everything I presented here, you should have what I call “Vanilla” Google Analytics Tracking in place and verified on your site. You have the “Waiting for Data” message, and are ready to move on with the installation of the other components that make up Google Analytics.
For more detailed information on how you can use Google Analytics to increase conversion of your website, be sure to check out Google Analytics Uncovered for Zen Cart: The Workbook..
In the next Part 3 of the series, I will discuss the E-commerce tracking component of Google Analytics.
Still having problems with Part 2? Contact me and we’ll work through it.
Hi there,
Thanks for this great module. I have installed it but I’m still getting “Tracking Not Installed” error at the Google analytics website. I have installed the Firefox add-on you suggested which advises me that “Google Analytics is installed on this page”. I have set the Zen Cart module to run the old “urchin” script.
Any help would be greatly appreciated…
Cheers,
Sam
If you are getting a tracking not installed error on the Google end, you may want to check the structure of the url that you are sending Google to to verify the code is installed.
In many cases, removing the trailing slash from the url that you send Google to helps resolve this issue.
The Firefox add-on will show that that code is installed on the page correctly, but just because it is installed on the page correctly does not mean Google can or will be able to verify it’s presence. That ability lies in the url that you give to Google for verification (in your Google Analytics account).
Thank you Eric.
Many thanks for your suggestion. I found out what the problem was; I omitted a “-1” from the end of the Google account code because it was not displayed by Google under the account information. Tracking is now ok but no data as yet. To try to fix the problem I have entered in “index.php” as my home page (is that correct?) and as the URL, “http://www.affordabledrivers.com.au/. However, you suggest removing the last “/”?
As long as Google says “Waiting for Data”, you should see statistics when they update nest (24 hours usually).
If you do not get the “Waiting for data” message, then you need to make sure that the url is correct. This may mean removing the trailing slash from the url.
Thanks Eric – everything working ok now – just had to wait for the data 🙂
Ah. Thank you – it was the trailing slash that was causing me to be staring at a “tracking not found” message. Come on Google – a little usability please – if there’s no trailing slash on the end of the URL, try adding one!!
Great website you have here – I have basic ecommerce abilities and I’m definitely picking up a lot here. I’m in the UK, so hopefully most of what you report on is subject to global use.