• Skip to main content
  • Skip to primary sidebar

Zen Cart Optimization

Practical How To's for Increasing Ecommerce Sales

  • Home
  • Categories
    • Blogging
    • Conversion
    • Customer Retention
    • Design & Usability
    • E-Commerce Optimization
    • Email Marketing
    • Featured
    • Marketing Strategies
    • Marketing Strategies
    • Mobile Commerce
    • Podcasts
    • Search Marketing
    • Shopping Cart Abandonment
    • Social Media
    • Website Analytics
    • Zen Cart Google Analytics
    • Zen Cart Optimization
    • Zen Cart Recurring Billing
You are here: Home / Archives for Website Analytics

Website Analytics

5 Steps to View Your Facebook Fan Page Stats in Google Analytics

by Eric Leuenberger 2 Comments

If you’ve had a Facebook Fan Page set up for any amount of time, you may have noticed a little thing called Facebook Insights. This “tool” is reportedly Facebook’s answer to analytics.

Most SEO and social media consultants will feel compelled to tell you that Insights offers very little insight. Aside from who has commented on your updates and the age, gender and geographical breakdown of your fans, there isn’t much other insight Insights can provide.

Almost makes you wish there was a way to use Google Analytics to see how your Facebook Fan Page is doing doesn’t it?

I’m happy to report, after finding a hack produced by the folks at Webdigi, a London-based Web Development company, there is a way to set up your GA account to retrieve Facebook stats.

Here’s how:

  1. Assuming you already have a Google Analytics Account, set up a new website profile, titling the new profile “Facebook,” “Facebook/URL” or something you’ll know is your Facebook analytics. Be sure to find and copy the UA code provided once you set up the new profile. (the code will look something like UA-#######-#)
  2. Because Facebook allows for limited Javascript (whereas Google Analytics required a more robust use of Javascript), you’ll need to create an image of each Facebook page you want to track. Luckily, Webdigi has a Google Analytics link generator for Facebook pages (http://ga.webdigi.co.uk/) available for free use (thus far, this is the only tool available that I can find that does this sort of link generation for Facebook to GA).
  3. Copy the entire Webdigi code provided into the part of the Fan Page you are tracking. (For instance, if you want to track your coupon tab, discount tab and special offers tab you’ll need a separate code for each page.) You’ll need to paste the code in an FBML on that page, below whatever HTML you may have used in the FBML (see image).
  4. Facebook-Google-Analytics

  5. To track your Facebook Fan Page Wall, you’ll need to create an FBML page which can be transferred into a box that appears on the left hand side of your wall. One of the best ways to do this is to post a list of resources or links, embedding the Webdigi below your HTML.
  6. Google Analytics will take approximately 24 hours to confirm your code and begin to report results. Once the checkmark appears next to the name you’ve designated for your Facebook Google Analytics, you will be able to measure metrics above and beyond what Facebook Insights provides.

Filed Under: Featured, Social Media, Website Analytics Tagged With: facebook, google analytics, Social Media, social media for ecommerce

Using Google Analytics to Track Email Campaigns

by Eric Leuenberger 11 Comments

In past articles I talked about using Google’s URL builder to track traffic from paid search channels outside Adwords (like MSN and Yahoo for example.)

In this article I thought I’d quickly show you how you can apply that same technique toward tracking of email campaigns as visitors have asked this as well.

Remember, generally Google Analytics looks for a few basic values in each link (yes you can track more items, but these are the basics.) The three basic pieces of information Google looks for in links is the campaign source, campaign medium and campaign name. The actual Google variable representations are listed below as a refresher but I have included some text that will help you from the email perspective.

  1. Campaign Source (utm_source). This identifies the name of your email marketing system, such as ConstantContact. If you don’t use a thirds party email marketing system, you can label your campaign source something general like ‘Email Marketing’.

  2. Campaign Medium (utm_medium). This identifies the campaign instrument used. In the case of email marketing, your medium is ’email’.

  3. Campaign Name (utm_campaign). This identifies the name of your campaign. The Campaign Name helps you differentiate between various campaigns or unique messages within each. Most Email Marketers use their message subject line or other identifying value for this parameter.

Here’s what the URL Builder might look like with those three variables filled in for an Email campaign:

emailtrackingGA

Viewing Email Campaign Results

Once you have built your url and inserted it into the proper location within your email, tracking will automatically begin. With the tracking results you can find out a number of things including: which links were most popular with your recipients, when they visited your website, how long they stayed and where they navigated following arrival.

With this information you can refine your future email marketing to gain better results.

How to view campaign results in Analytics:

  1. Log into your Google Analytics account.

  2. Click ‘Traffic Sources’ from your Dashboard.

  3. View your ‘Top Traffic Sources’ or click ‘View Full Report’ to see all traffic sources.

  4. Locate and click the link identifying your email marketing Campaign Source. In our example above, your Campaign Source is your email marketing product, i.e. ConstantContact, or ‘Email Marketing’.

On your Campaign Source page, Google Analytics provides details on the number of visitors generated by your campaign, the number of pages they visited, average time on your website, percent of new visitors to your website and the average bounce rate.

Campaign managers can also drill-down using the segments drop-down menu. This provides even greater detail on individual campaigns, keywords, geographic regions, browser types, operating systems and visitor activity, like the most popular landing and exit pages. Each results page provides the means to drill-down even further and fine-tune your data.

Here is what the top level report might look like when segmented by ‘Source’ in Google Analytics:
emailtrackingGA2

Here is what the top level report might look like when segmented by ‘Medium’ in Google Analytics:
emailtrackingGA3

Here is what the top level report might look like when segmented by ‘Campaign’ in Google Analytics:
emailtrackingGA4

To get more detailed information on each you can further filter, segment, etc… and even drill down by clicking the link to the page you want to see more information on.

Now, if you haven’t had the ability to do so already, you can get better metrics from your email campaigns within Google Analytics.

Got any other ideas for email tracking with GA? Post your ideas below. I’d like to hear them.

Filed Under: Email Marketing, Website Analytics Tagged With: google analytics email tracking, tracking email with analytics

How to use Google Analytics to Track Your First Time and Return Visit Buyers

by Eric Leuenberger Leave a Comment

More on advanced reporting with Google Analytics here.

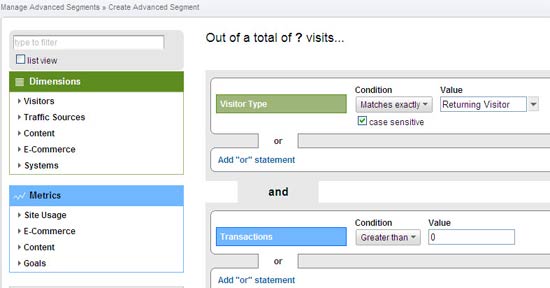
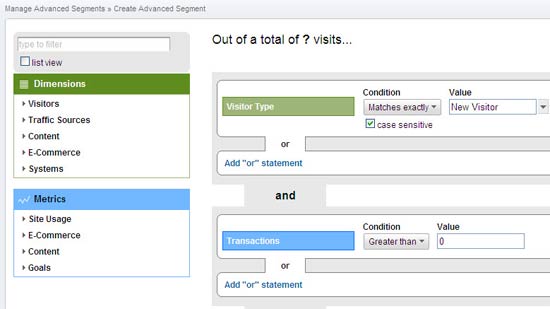
Because your website is only as good as your ability to convert visitors into buyers, the following two advanced segment reports in Google Analytics will help you capture your first time visitor/buyers into repeat visitor/buyers. Follow the selections on the screen shots to set up your own site-specific reports.

First time buyer
This particular report can help you understand what motivated visitors to buy on their first visit. What you learn from this report can help you to motivate future new visitors to purchase in as few visits as possible.

first-time-buy-1

Return visit buyers
You can use the return visit buyer reporting tool to understand your returning visitor’s behavior. If they didn’t buy on the first visit, use the data in the report to optimize your site or process to ensure you convert visitors to purchases sooner.

return-visitors

Filed Under: E-Commerce Optimization, Website Analytics Tagged With: ecommerce, google analytics

« Previous Page
Next Page »

Primary Sidebar

Sponsors

MemberPress Wordpress Membership Site Plugin

Categories

  • Articles
  • Blogging
  • Breaking News
  • Conversion
  • Customer Retention
  • Design & Usability
  • E-Commerce Optimization
  • Email Marketing
  • Featured
  • Marketing Strategies
  • Mobile Commerce
  • Search Marketing
  • Shopping Cart Abandonment
  • Social Media
  • Uncategorized
  • Website Analytics
  • Zen Cart Contributions
  • Zen Cart Optimization
  • Zen Cart Recurring Billing

Copyright © 2023